Re-Sealing Your Concrete Patio
The Importance of Re-Sealing Your Concrete Patio: A Guide for Homeowners
Your concrete patio is a versatile and durable outdoor space, perfect for barbecues, relaxation, or simply soaking up the sun. However, like any exterior surface, it’s exposed to harsh elements—rain, UV rays, freeze-thaw cycles, and foot traffic that can degrade its appearance and integrity over time. Re-sealing your concrete patio is a critical maintenance step to protect it. Re-sealing your concrete patio extend its lifespan, and keep it looking pristine. In this blog post, we’ll explore why re-sealing is essential, how homeowners can tackle the job themselves (with some caveats), and why choosing the right sealer matters—whether you DIY or hire a professional.
Why Re-Sealing Your Concrete Patio Matters
Concrete is naturally porous, meaning it absorbs water, oils, and other substances that can cause staining, cracking, or surface deterioration. A quality sealer acts as a protective barrier, offering several key benefits:
-
Moisture Protection: Sealing prevents water from seeping into the concrete, which can lead to cracks during freeze-thaw cycles or mold growth in humid climates.
-
Stain Resistance: A good sealer repels oil, grease, and other spills, making cleanup easier and preserving the patio’s appearance.
-
UV Protection: Sealers with UV inhibitors reduce fading and chalking caused by prolonged sun exposure.
-
Enhanced Aesthetics: Sealers can enhance the concrete’s color, add a glossy or matte finish, and give your patio a fresh, polished look.
-
Longevity: Regular re-sealing (every 2-5 years, depending on the sealer and climate) can significantly extend the life of your patio, saving you from costly repairs or replacement.
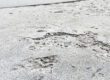
Neglecting to re-seal leaves your patio vulnerable to damage, resulting in unsightly stains, cracks, or a dull, worn appearance that diminishes your patio’s overall appeal.
DIY Re-Sealing: How to Do It (and the Risks of Getting It Wrong)
Re-sealing your concrete patio is a project many homeowners can tackle with the right tools, materials, and patience. Here’s a step-by-step guide to doing it yourself:
Materials Needed:
-
Pressure washer or garden hose with a high-pressure nozzle
-
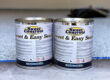
Concrete sealer (acrylic, outdoor urethane, or polyurethane, depending on your needs)
-
Paint roller, sprayer, or brush for application
-
Painter’s tape and plastic sheeting to protect surrounding areas
-
Safety gear (gloves, goggles, mask)
Steps:
-
Clean the Patio Thoroughly: Remove dirt, grime, and stains using a concrete cleaner and a pressure washer. Ensure the surface is completely dry before proceeding (this may take 24-48 hours).
-
Repair Cracks: Fill any cracks or chips with a concrete patching compound and let it cure fully.
-
Choose the Right Sealer: Select a sealer suited for exterior concrete patios. Acrylic sealers are popular for their ease of application, while polyurethane sealers offer greater durability but are harder to apply.
-
Apply the Sealer: Follow the manufacturer’s instructions carefully. Use a roller or sprayer for even application, working in small sections to avoid pooling. Apply thin, even coats, and allow proper drying time between coats (typically 4-24 hours).
-
Let It Cure: Avoid foot traffic for at least 24-48 hours to ensure the sealer sets properly.
The Risks of DIY Mistakes
While DIY re-sealing can save money, it’s easy to make mistakes that lead to poor results. One of the biggest risks is applying the sealer incorrectly, which can cause it to peel, flake, or bubble over time. Common errors include:
-
Inadequate Cleaning: Dirt, grease, or old sealer residue left on the surface prevents proper adhesion, leading to peeling.
-
Over-Application: Applying too much sealer creates a thick, uneven layer that traps moisture and peels up, leaving a patchy, unsightly mess.
-
Wrong Sealer Choice: Using a sealer not designed for exterior concrete or heavy traffic can result in premature failure. Proper adhesion to the surface is also a major issue.
-
Poor Timing: Applying sealer in extreme heat, humidity, or rain can cause improper curing, leading to cloudiness or adhesion issues.
When a sealer peels, it looks worse than an unsealed patio. Think flaky, discolored patches that scream neglect. Correcting this requires stripping the old sealer (a labor-intensive process) and starting over, often at a higher cost than doing it right the first time.
The Pitfalls of Hiring the Wrong Professionals
Hiring a professional to re-seal your patio can take the guesswork out of the process, but not all companies are created equal. Many contractors cut corners by using the cheapest sealers available, which can lead to the same peeling and flaking issues as a botched DIY job. Here’s why this happens:
-
Low-Quality Sealers: Bargain sealers often lack UV resistance, durability, or proper adhesion properties, causing them to wear off or peel within a year or two.
-
Poor Surface Preparation: Some companies skip thorough cleaning or repairs to save time, compromising the sealer’s performance.
-
One-Size-Fits-All Approach: A contractor using the same cheap acrylic sealer for every job may not account for your patio’s specific needs, such as high traffic or extreme weather exposure.
The result? A patio that looks terrible sooner than expected, requiring costly reapplication. To avoid this, research concrete resurfacing companies carefully. Ask about the type of sealer they use, request references, and ensure they follow industry-standard preparation and application techniques. A reputable company will use high-quality sealers that properly adhere to inorganic material (like the old sealer) and provide a warranty for their work.
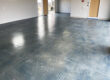
Re-Sealing Your Concrete Patio With Sweet Concrete
Sweet Concrete specializes in concrete re-sealing so you know your patio will look great after completion. Here are some of the benefits of choosing Sweet Concrete:
-
Quality Preparation: We properly abrade, degrease, clean, and prepare the concrete prior to the re-sealing process.
-
High Adhesion Sealers: Sweet Concrete uses the highest adhesion sealer on the market. These sealers bond to inorganic material like old sealers just as well, if not better, than raw concrete.
- Sheen Options: This amazing sealer comes in a gloss or satin finish.
-
Color Enhancement: We also can add tint to the sealer which enhances the colors of the concrete. This is a great option for worn out, faded stained concrete surfaces.
-
Longevity: The sealer’s lifespan is usually five to ten years which is 10x longer than the average acrylic sealer lasts.
-
Warranty: Sweet Concrete offers a five year warranty on all of our re-sealing services.
Conclusion
In conclusion, re-sealing your concrete patio is a small investment that pays big dividends in protecting your outdoor space and enhancing your home’s appeal. While homeowners can take on this project themselves, the risk of applying the sealer incorrectly can lead to peeling and an unsightly mess that’s hard to fix. Similarly, hiring a company that uses cheap, low-quality sealers can produce the same disappointing results. By understanding the importance of proper preparation, choosing the right sealer, and following best practices (or hiring a reputable company like Sweet Concrete), you can ensure your patio stays beautiful and durable for years to come. So, roll up your sleeves or pick up the phone—your patio deserves the protection it needs to shine!
Treasure Valley Residents
If you live in the Treasure Valley Idaho area like Boise, Meridian, Nampa, Caldwell, Garden City, Eagle, Star, Dry Creek, or Middleton, you should give us a call today. We’ll come out and audit your concrete free of charge!
208-957-0479